
Don’t forget your annual checkup (of your retirement readiness)
Checkups — they’re something we all know we should do and they’re easy to postpone. But whether you’re considering your physical health or your retirement readiness, it’s important to get a regular review of your vital signs so you can make any needed changes.
The good news is that you don’t have to schedule an appointment for a checkup of your retirement readiness. You can do it yourself at any time on empowermyretirement.com. Start with the following:
1. Check your Lifetime Income Score1 – Your Lifetime Income Score is a helpful estimate of your future retirement readiness. When you log in to your account, you can immediately see whether you’re on course to meet your retirement income goals. Choose the “Other Assets” link to add other retirement income like a pension or IRA for a more realistic score. Then you can experiment with how a change in your planned retirement date and your contribution rate affect your retirement income. And you can get recommendations for other things you can do to achieve the retirement you want.
2. Consider increasing your contribution amount – If you’ve never changed the amount you contribute to your retirement account from when you first enrolled, it may be time for an update. Your contribution level is one of the most important factors in reaching your retirement goals.
3. Review your asset allocation2,3 – Does your retirement investment portfolio have the right balance of risk and return potential for your age and situation? In general, people reduce their investment risk as they get closer to their retirement date. They want to protect the assets that they’ll soon rely on for retirement income. But if you still have years or decades to go before you retire, investing too conservatively could limit your ability to capitalize on compounded growth potential.
4. Designate — or update — your beneficiary information – A beneficiary is the person you choose to inherit the assets in your retirement account in the event of your death. If you never designated a beneficiary — or if you need to update your choice — take a few minutes to log in to your account and complete this important task. It can make the process of settling your affairs a little easier for the people you care about.
If you have questions about any of these areas — or if you’d like other suggestions for your retirement readiness checkup — schedule some time with your retirement plan advisor, Tom Ferguson, by contacting him at 720-538-6864 or [email protected].
1 IMPORTANT: The projections, or other information generated on the website by the investment analysis tool regarding the likelihood of various investment outcomes, are hypothetical in nature, do not reflect actual investment results and are not guarantees of future results. The results may vary with each use and over time. Healthcare costs and projections, if applicable, are provided by HealthView Services. HealthView Services is not affiliated with GWFS Equities, Inc. Empower Retirement does not provide healthcare advice. A top peer is defined as an individual who is at the 90th percentile of the selected age band, salary range and gender.
2 Asset allocation does not ensure a profit and does not protect against loss in declining markets.
3 Diversification does not ensure a profit and does not protect against loss in declining markets.

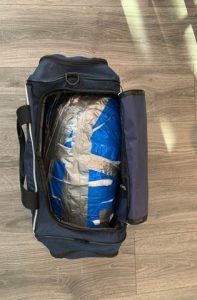 The sandbag is the easiest of the three pieces to make so let us start there. For making the sandbag you will need a bag of sand (purchased at any big box home store for less than $5), two trash bags, a roll of duct tape, and a duffle bag/gym bag. To start, you need to figure out how heavy of a sandbag you would like to make and pour out sand to get your desired weight. Now with the desired weight in the sandbag, duct tape the opening to keep the remaining sand from spilling out. Next put the bag into the first of two trash bags. Duct tape that bag and then put the second trash bag over everything. Now you want to duct tape everything especially well and then put the whole thing into a duffle bag/gym bag, and you are done.
 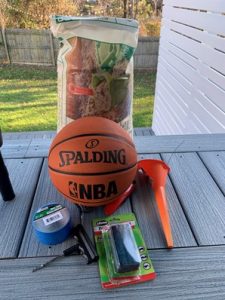 This one is a little more involved and requires a bit more patience. For this, you will need a basketball ($5 new from Five Below or any discount store or use an old one), sand, funnel, razor blade, sticky tire plug x 2-3, and duct tape. To start you want to cut a small hole in the basketball (the smaller the better- this one was a little bigger than I would have liked because I couldn’t find my smaller funnel). Once you have your hole cut you just start funneling sand into the ball until you get to your desired weight (max weight is around 25 pounds based on the size of the ball).
 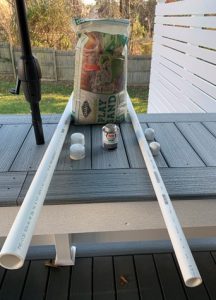 Out of the gate, these body bars can be highly variable based on your objective. Supplies needed for this are PVC (length and diameter will dictate max weight), two end caps for each bar, sand, and PVC cement, funnel (optional). Pre-cut (as pictured) PVC was used. Pictured on the left is PVC measuring 5 feet by 1.5 inches and on the right is PVC measuring five-feet by 1.0 inch. To start, use the PVC cement and cement one end cap onto the pipe and let it dry. Once the cement is dry fill the PVC with as much sand as you desire. Completely filling the 1.0-inch pipe led to a bar weighing about 8 pounds and filling the 1.5-inch pipe fully led to a bar weighing about 15 pounds. Once you fill the bar to your desired weight use the PVC cement to seal the open end.